Need to use the TikTok server-to-server API to track conversions? Got you covered.
We have added Custom Scenarios to FunnelFlux Pro to cover this.
Here's what you need:
- A TikTok account, obviously
- A pixel and its ID -- and you must be the owner of the pixel
- A few minutes of spare time
Preface - Creating Pixels and Priming Events
A lot of users have been asking about this, and TikTok has recently updated their UI around pixel creation.
Please note TikTok is often changing their UI, so some of the instructions below might become outdated (but should still be reasonably easy to follow).
Creating a pixel
- Go to Assets > Events, then choose manage web events.
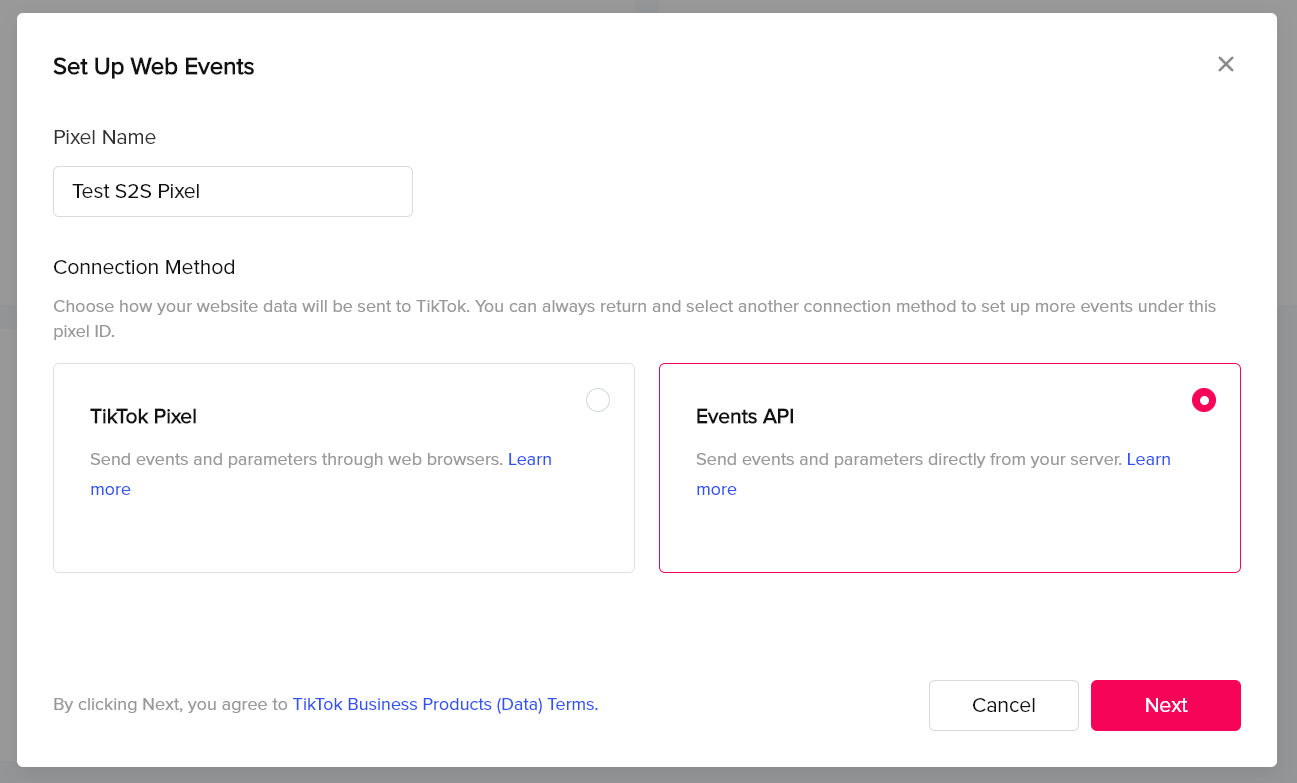
- Click manage web events > create a pixel using the Events API mode
- Select manually set up the events API. The click the "Go to settings" button to complete the setup

Testing and priming web events
If you have a web-based pixel (not the events API choice, but rather TikTok Pixel), you can use the page below to send dummy events to show that its working and create recent activity:
https://test-resources.funnelflux.pro/tiktok/pixel-test.html?pixel=XXX
Replace the XXX with your pixel ID and load this page. The page should say the ID that was loaded, and you have a number of buttons that will trigger TikTok events.
- If you want to verify a standard pixel, you can use the above URL with your pixel ID included as the verification URL. It should verify fine using that (if they still have this feature)
- If you click your pixel in TikTok's UI > test events tab, you can use this URL to generate QR code and test on your mobile device. Click the various buttons and you should see test event appear
- Load this URL in your browser normally and click each button 3-5 times to spam them with some events. Wait a few minutes and refresh the pixel settings in TikTok, and you should see your events there.
Once you have done #3 above, all these events should appear as active for the pixel.
Setting up the Events API for Conversion Tracking
It is not clear in TikTok's documentation, but if you are not the owner/admin of the pixel (e.g. you were just shared access to it), then your access token will not have permission to send conversion events to that pixel via the API.
If a pixel was shared to you, you will need to ask the owner to do the action below and then give you the access token produced.
Step 1 - Generate an Access Token
Firstly you will need to generate an access token that allows our TikTok conversion API app to access your account and its pixels.
To do this, head to your events API pixel > settings. Scroll down and you should see an area like this:

This will generate a pixel-level access token, which will only work for this pixel. Keep this in mind as if you try to use it for other pixels it will not work.
Copy that value and use it in the custom scenario settings in FunnelFlux (for the TikTok traffic source > conversion tracking tab)
Step 2 - Set up TikTok as a Traffic Source in FunnelFlux
In FunnelFlux, go to the traffic sources page and create a new one.
Start typing Tik... in the name and select the TikTok template.
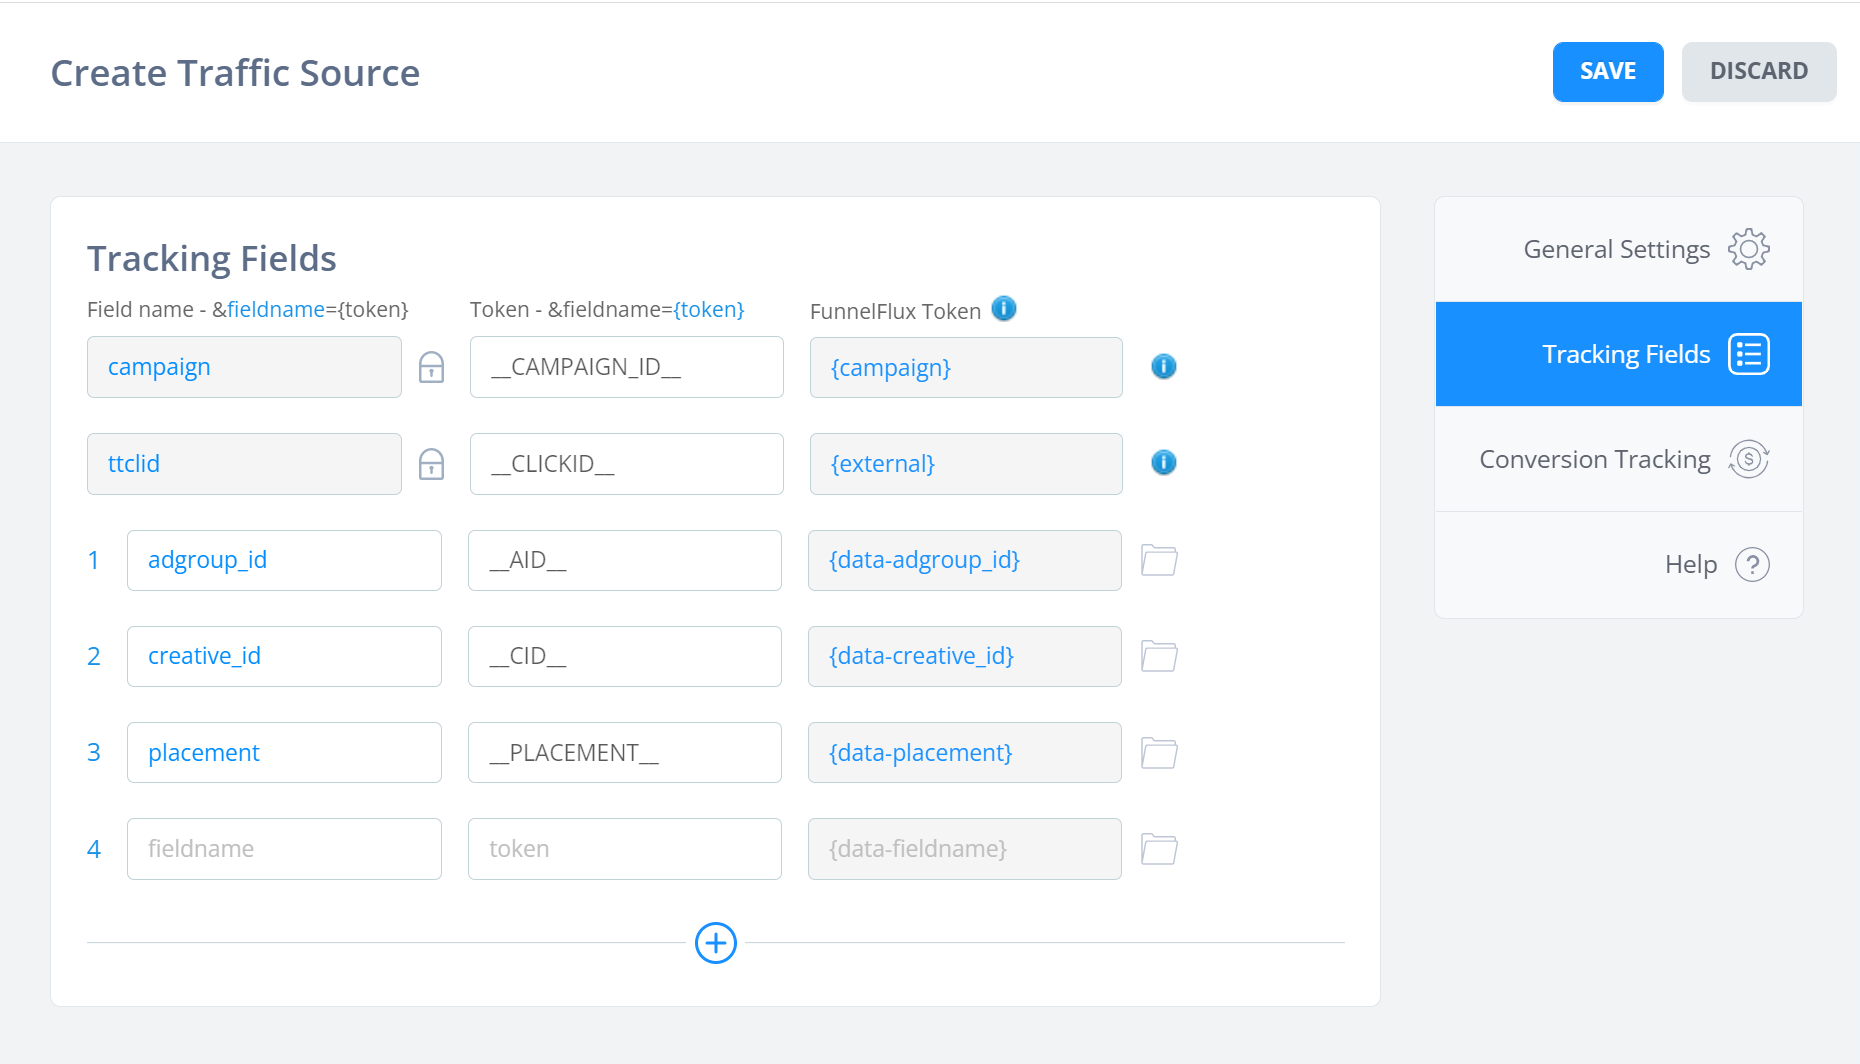
This will fill out the tracking field section like so:

Here the one we critically need is the external field, which will work fine, and is currently set to capture the ttclid parameter (which has the token __CLICKID__).
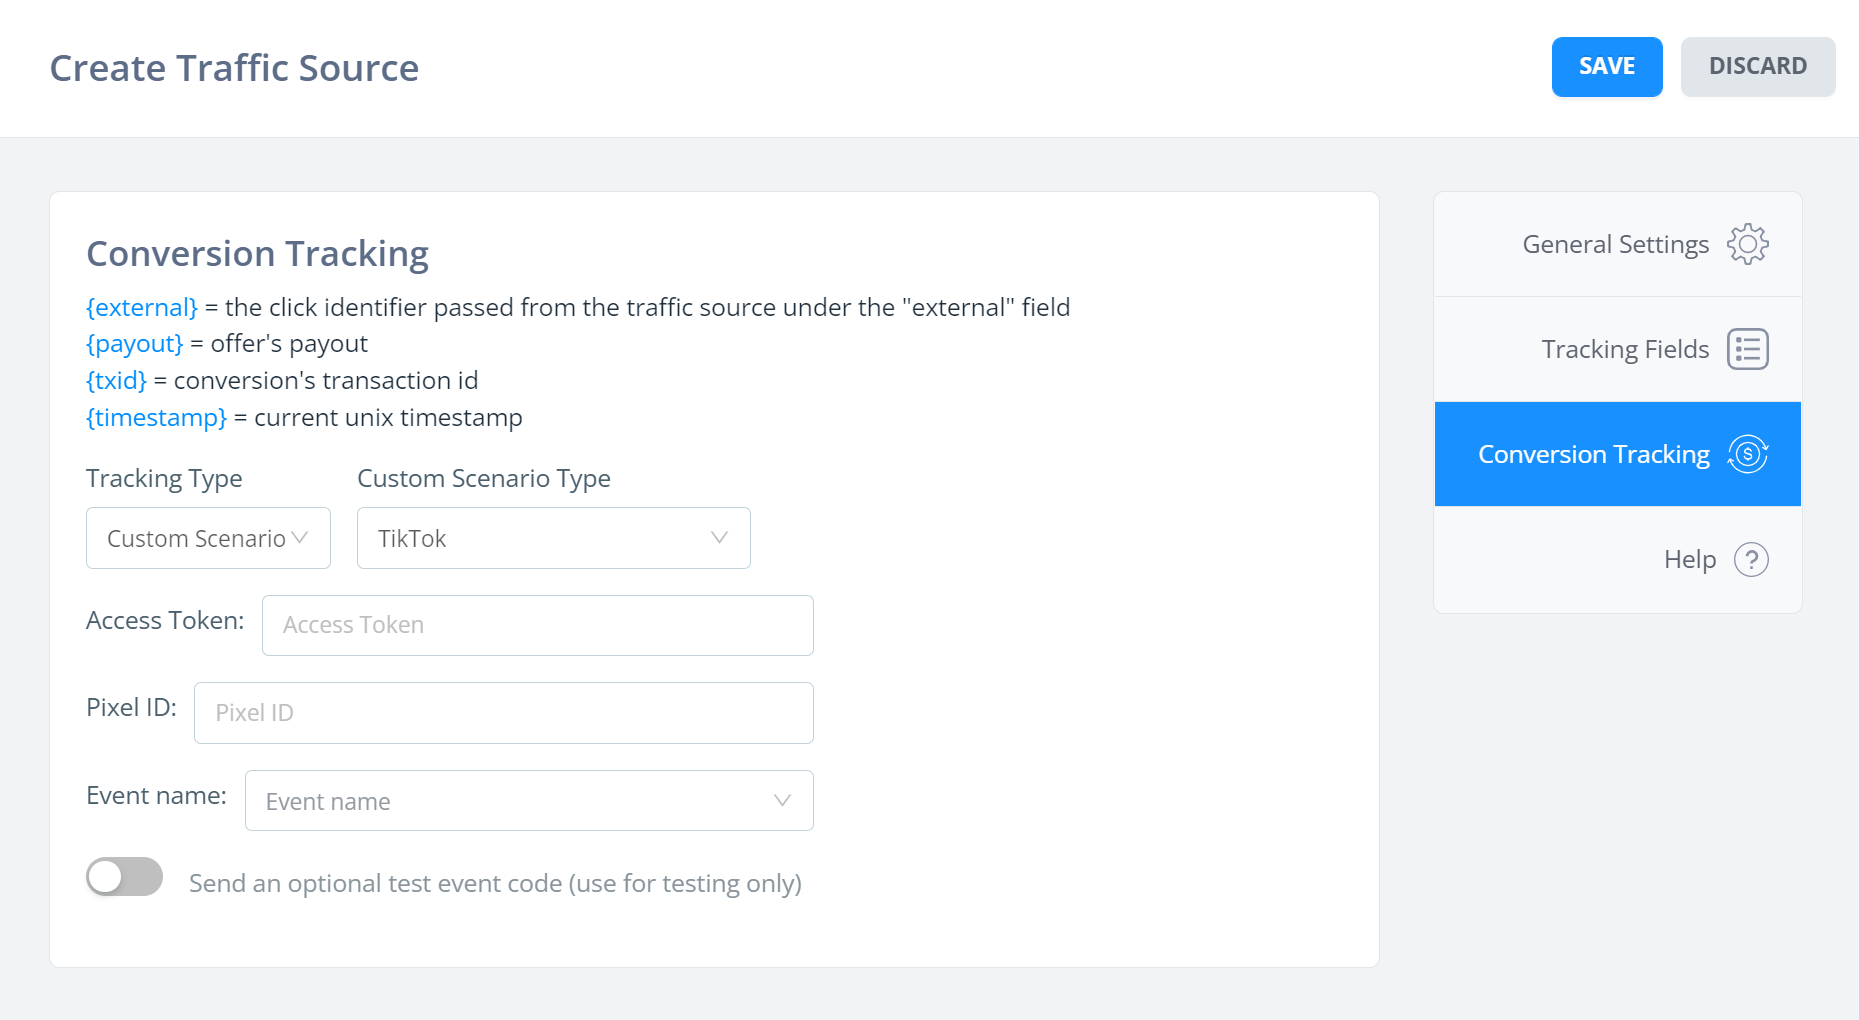
Now head to the conversion tracking tab, pick Custom Scenario > TikTok:

Here you need to:
- Paste your access token that you generated earlier. Ensure that this does not have an errant whitespace before/after
- Place your pixel ID, which you can get from the TikTok UI
- Choose one of the standard event names
Right now, you can only send a single event name for the traffic source. However, you can choose the "Custom – Transaction ID Value" option and then in your conversions/postbacks, send tx=eventName. Then that eventName would get passed back to TikTok as the standard event name. A useful workaround if you want to use transaction IDs to send different event types.
The TikTok standard events are documented here (use the table of contents on the right-hand side). These are the available events as of writing:
ViewContent
ClickButton
Search
AddToWishlist
AddToCart
InitiateCheckout
AddPaymentInfo
CompletePayment
PlaceAnOrder
Contact
Download
SubmitForm
CompleteRegistration
Subscribe
We automatically pass the revenue value from your conversion and a currency value of USD.
And that's it! You should now track TikTok events via S2S.
Intended Updates
Data Passing
We plan to automatically pass the following as well, in a later update. We will do something similar with our FB conversion tracking scenario.
- content_type - category of offer that converted
- content_id - FunnelFlux ID of the offer page that converted
- description - name of the offer that converted
Page URL Overrides
We are aware that sending the offer URL is not always ideal, especially for sources like Facebook where domain verification is required.
We are working on a page URL override feature that will allow passing a URL to your offer/network, then sending that back in any conversion tracking to tell our system to use a different URL from the offer URL.
Our goal here is allowing you to pass the URL of the initial page the user landed on -- not necessarily a lander, but just the first page from the ad click -- because this has the highest chance of being a page under your control.
We unfortunately can't simply add a new token to postbacks/custom scenarios like {first-page-visited} because its not practical to query a single row in our analytics database for every conversion, to look up a related value. But, we have a solution in mind!
Custom Events
When we add custom events to our system, we would allow you to define different event names to send to TikTok for each of these events. E.g. custom event 1 (alias lead) --> send event name CompleteRegistration, etc.


